

Modern consoles are cashing in big these days on nostalgia, charging a premium on repackaging old games for new systems or even charging you a subscription (I’m looking at you Nintendo) to revisit your childhood and play your favourite old games.
I say, “f!ck that noise, build it yourself.”
It can be tempting to go out and buy a Raspberry Pi, slap RetroPie on it, plug it into your TV, and call it a day. And you know what, that might work for some people, but for those of us that grew up using the real hardware on a CRT, you’re going to notice something:
Emulators suck
It’s hard to pin down exactly why they suck, but they do. It doesn’t look right, it doesn’t sound right, and it just doesn’t feel right. The picture is too sharp, the colours are different, the sound isn’t pitched right, and no matter what you do, you can’t get rid of the damn input lag on the controls. Regardless, it’s not satiating my nostalgia monster, and that’s a problem.
Stop pretending
No more faking the funk, the only way to satiate the nostalgia monster is to do this for real. Luckily, doing it for real is not actually that hard.
No more shortcuts, here’s what you need:
- A Plan
- The TV
- The Console(s)
- Cables, Switches, and Splitters
- The Games
Make a plan
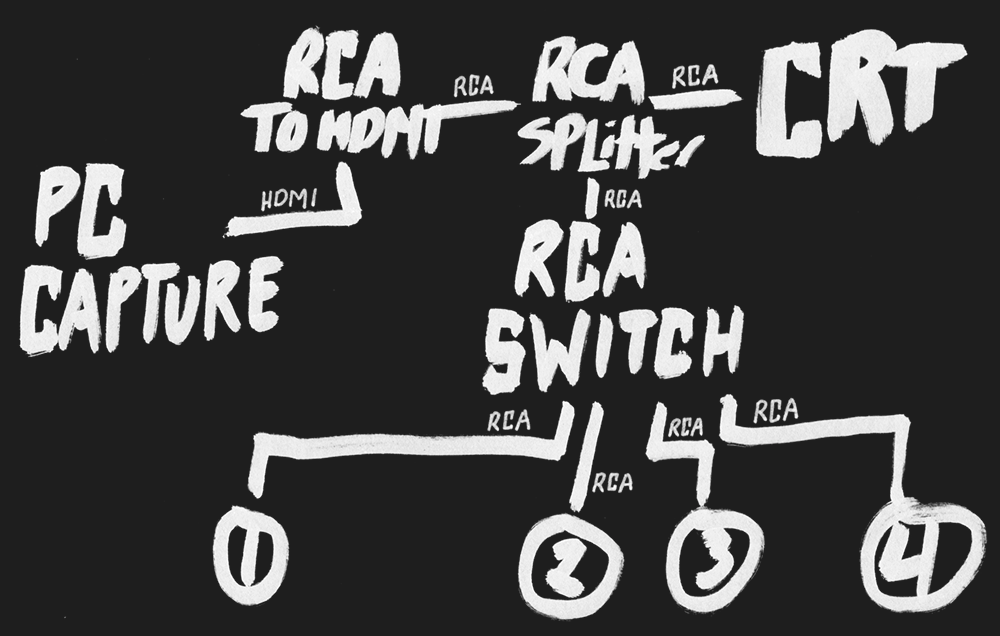
Put it on paper, this will help you visualize what you need and were you need it. Believe me, depending on the complexity of the setup, you might find yourself in a tangled mess of wires, so it’s good to have a plan to look at when you’re in the thick of it.
Now that you have your plan, let’s talk about each of the pieces you’ll likely need.
The TV
Some people invest insane amounts of cash into retro scalers so they game play these classic games on their modern TVs. And after after dropping all that cash, they find out the hard way that their high tech, top of the line TV ain’t going to cut the mustard. The problem is (and this is going to sound weird) it’s just not fast enough. You need to go analog if you want to get rid of that input lag; you need a CRT.
So where do you get one of these dinosaurs? Keep an eye out: thrift shops, flea markets, abandoned at the side of the road, dumpsters. You probably know someone with one of these beasts covered in dust in their attic because they don’t know how to get rid of it. Let people know you’re looking for one and you might be surprised how easy it is to score one for free. I scored mine from a guy at work who had it sitting in his workshop at home. He was just about to chuck it in the dump.
Retro graphics were made for CRTs, so your games look better; they have no input lag, so your games feel better (and they work with old zapper guns); and you can probably score one for free instead of forking out insane money for a retro scaler.
CRTs are beefy
Keep in mind, this ain’t no lightweight modern flat-screen. CRTs weigh a lot (especially as they get bigger). Modern TV stands aren’t designed for that kind of weight, so make sure to consider what you’re putting this thing on. Choose wrong and your whole setup could become kindling.
The consoles
It’s going to be tempting to get one of those cheap all-in-one retro systems or (like I said before) buy a Raspberry Pi and install RetroPie on it. Don’t do it. You know what’s infinitely better (and maybe even cheaper)? Getting the actual console(s). Again, ask around; let people know you’re looking for the console. Stop into you’re local vintage gaming shop, it’s very likely they have exactly what your looking for.
Pick the console(s) that hold a special place in your heart and focus on acquiring them. For me it was:
- Nintendo Entertainment System (NES)
- Super Nintendo Entertainment System (SNES)
- Sega Genesis
- Sega Dreamcast
Cables, switches, and splitters
The thing about old CRTs is they don’t switch between inputs, so any switching needs to be done before it reaches the TV. Luckily, most retro consoles (at least during my time) used the sole connection type available on your CRT:
Red, White, and Yellow
Check your TV and you’ll likely see a three ports coloured red, white, and yellow. These are RCA ports, and these colours correspond to audio right, audio left, and video. Before you go out and buy a bunch of cables, check your consoles. Some consoles come with cables that have a proprietary end that plugs into the console and an RCA end that plugs into your TV.
Check your plan, take an inventory, and grab any additional cables, RCA switches, and RCA Splitters you need to get the job done. There’s nothing more frustrating than trying to piece everything together only to find out your missing a piece.
Wire it all up, connect everything to power, and you’re ready for:
The Games
This is the hardest part. If you’re lucky, you’ll still have them laying around from your childhood. If not, you need to get them somehow.
There are essentially two options here:
- Physical cartridges
- ROMs (no judgement here, I ain’t going to ask how you got em)
If, you have the ROMs (however that came to be), you need a way to play them on the actual hardware. That’s where flash cartridges (like the EverDrive) come in. These are wild devices that deliver the game ROM to the console as if you had the physical cartridge. Some even have save states, and game genies built in.
Either way, now you’re set to revisit the nostalgia (and frustration) from your childhood. Congratulations, your nostalgia monster is satiated…
for now.